Last month is known as Jelly Bean OTA update for the Galaxy Nexus release. And after update your nexus will loses the root acces, so you must root your device again if you want to get more benefit from android 4.1 jelly bean. And because the root process on this device is maybe rather need more step then any other device so we will give to you easy tutorial how to root Galaxy Nexus and also how to unlock its bootloader. unlock bootloader is needed when you want to install custom rom. this will work for many galaxy nexus device. You can check wether your model is in the list or not. on tutorial below
With root privileges you can open one up many new possibilities in dealing with an Android smartphone - of course you can flash custom ROMs and kernels, but also complete system backup (nandroid) create, delete system apps, and much more. But rooten course involves some risks.
Read First
- Before you begin, read our instructions completely and follow the instructions so carefully as possible.
- Who root his device at the system level. The risk of loss may be very small. Neither we nor the manufacturer assumes not responsible for the damage.
- Who Custom firmwares and / or reflashing ROMs or root his device, will void his warranty. if you want the warrnty back you can do it by install the stock rom or official firmware
- After rooting the you want to install a custom ROM, the bootloader must be unlocked. and to make sure just in case if something happens you must make a backup. We have, as a guide to the appropriate point
Important
After you have read the statement above, we can finally begin. Since we assume that everyone wants to save on the unlock bootlader process on galaxy nexus smartphone, you must root your galaxy nexus first because to take backup you need to have a root acces, beacuse unlcok bootloader will remove all your data. After unlocking the bootloader, the device must be unfortunately be rooted again. Who does not wish to back up first can skip the first root process. but if you want only to root your device you just need to do the root step. you not need to do the unlock bootloader step.
How to Root Galaxy Nexus
- First we need the Galaxy Nexus Toolkit, a program for the PC, with which we can perform the root process and a variety of other actions in a simple manner. The latest version of the Galaxy Nexus Toolkit can be found respectively in the official thread at XDA-Developers here.
- download the file then install on your computer and then runs the program.how to root galaxy nexus

- The following selection screen you must select the proper software version of your phone. In Europe Yakju variant is represented - the exact build number can be found under Settings ⇒ Over the phone.
- Then acticate the usb debugging in the settings, by Settings ⇒ developer options equal to activate USB debugging yet.
- Then, we need to install the drivers for your device that will be connected to the PC. It simply chooce the number 1.galaxy nexus toolkit menu

- Then to root your device with nexus Toolkit choose the number 4.
- Next, your device will launch in the fastboot mode: For this you need to turn off the power first. Then you need to press volume up and down, and power to be pressed and held.
- Now your device is connected via USB cable to your computer. then your phone launches toolkit to root-process automatically.
- During the root process, the Galaxy Nexus starts multiple times - in time you should leave it alone until the GN toolkit tells you that the process is complete.galaxy nexus toolkit root complete

- Thus the first step would already be done.
Backup
At this point you have the option to create a backup.
Selected for the number 2, your smartphone connects to the PC and answer the question with yes. The next question you can choose the second option and then wait until the backup was made and copied to the PC. Optionally, you also have the option of the app Titanium Backup to use - important though is that you then copy the backup archive on either the PC or stored in the cloud (Dropbox or Google Drive).
Now the unlock bootloader process, the Galaxy Nexus rooted again and a custom recovery installed. There are two possibilities:

Either you perform each step (3 to 7) individually - you have your smartphone for each start in fastboot mode - or you can choose the 8 whereby the said points are automatically executed in succession. Since it is also the second option can not just sit back and comfortably sit and watch, here are the steps briefly described.
Unlock Bootloder
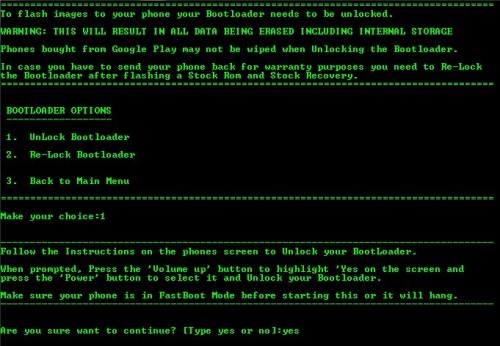
- To unlock bootloder on your galaxy nexus first select the number 3 and press Enter.
- Since the bootloader to be unlocked, the next one is the option of your choice.
- The Galaxy Nexus in fastboot mode start.
- Warning: The next step is the bootloader unlocked and erase all the data on your phone (!). This is the last chance to make a backup.
- Once you typing yes and pressing Enter, the process begins. This may take several minutes.
- During the process you will be asked on the Galaxy Nexus, if you really want to unlock the bootloader. Selects yes with the volume rocker and confirmed with power.

After unlock bootloader then root your phone again because after unlock your root acces is lose
read above.
Install Custom Recovery
- Before a custom recovery is flashed, the old Google's own recovery need to be renamed.
- Launches the Galaxy Nexus in fastboot mode.
- Give the 5 is in the Galaxy Nexus Toolkit.
- Confirmed with yes and wait a while until the process is complete.
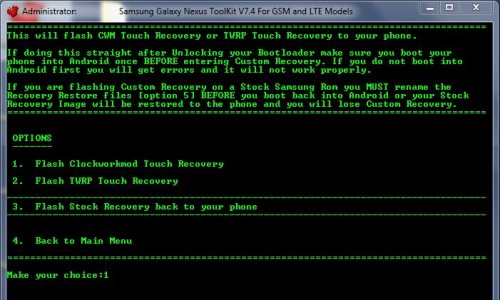
- Back in the main menu of the toolkit, then choose 6 to install a custom recovery.
- You have the choice between the ClockworkMod Recovery Touch and the TWRP Touch Recovery. This is a matter of taste - I personally prefer the popular ClockworkMod.
- When did you decide it for recovery, you choose the appropriate number and wait until the process is completed.

Done - now you have succesfully root galaxy nexus and have been finished to prepare for install custom rom. next time i will show come custom rom for this smartphone. so stay update with this blog

Title Post: Easy Tutorial Root Galaxy Nexus On Android 4.1
Rating: 100% based on 59998 ratings. 5 user reviews.
author : asasfad
Thanks for visiting tutorial for android blog, If any criticism and suggestions please leave a comment
Rating: 100% based on 59998 ratings. 5 user reviews.
author : asasfad
Thanks for visiting tutorial for android blog, If any criticism and suggestions please leave a comment
Related posts:
If you enjoyed this article, subscribe to receive more great content just like it.
Subscribe to:
Post Comments (Atom)
0 comments:
Post a Comment